Introduction
Last winter was pretty cold in Toronto with temperatures reaching into the -30’s. A combination of poor insulation and poor HVAC design in our condo led to several occurrences of frozen pipes in our kitchen. As an alternative to an expensive repairs, we decided to build a small sensor that could notify our thermostat to turn the heat on when the temperature in the kitchen reached a certain threshold.
At that point, I had been experimenting a bit with the new Particle (formerly Spark) Core microcontroller. The Particle Core is a wifi enabled, ARM based microcontroller programmed via an easy to use cloud development environment. Connecting a simple temperature sensor to the core would allow us to track and respond to changes in temperature and automatically instruct our Nest thermostat to adjust the temperature accordingly.
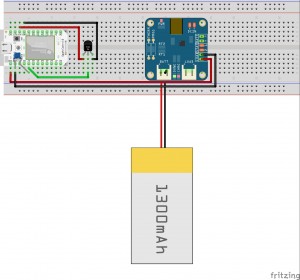
The Particle Core controller with temperature sensor, LiPoly battery, and USB charger.
Building the Circuit
The circuit is super simple, consisting of the controller , a common TMP36 temperature sensor , battery , and charger . All the elements are plug-and-play and can be assembled based on the above diagrams. The device spends most of its time sleeping in a very low power state, waking up every 15-30 minutes to take a reading. The time for the unit to wake up, connect to the cloud, take a reading, and go back to sleep was usually less than 30s. With a 1300 mAh battery, we only charged the device two or three times across the whole season.
Programming the Particle Core
The team at Particle has done a wonderful job developing an API that allows end users to really focus on building cool projects. Because of this, the entire process of reading the temperature and publishing it to an online data stream can be accomplished in just 25 lines of code! By design, the API is very similar to Arduino.
int reading = 0;
double voltage = 0.0;
double temperature = 0;

void setup() {
pinMode(A7, INPUT);
Spark.variable("temperature", &temperature, DOUBLE);
Spark.variable("reading", &reading, DOUBLE);
Spark.variable("voltage", &voltage, DOUBLE);
}

void loop() {
delay(5000); //We delay to allow the network connectivity to fully establish
reading = analogRead(A7);

voltage = (reading * 3.3) / 4095;

temperature = (voltage - 0.5) * 100;

char tempString[10] = {"01"};
sprintf(tempString,"%f",temperature);
Spark.publish("temperature",tempString);
delay(5000); //Again, this delay is to ensure the publish was successful
Spark.sleep(SLEEP_MODE_DEEP,900);
}
Interfacing the Core with the Nest
Although it is likely now possible to have the Core communicate directly with the Nest API, at the time the Particle cloud API was still maturing. To interface the core with the Nest, I decided to write a simple Python script that runs on a local Linux machine to act as the proxy between the devices. The script does the following:
- Subscribes to the data feed from the Particle cloud API
- Logs new temperature data to a web based data store hosted by SparkFun .
- Checks whether the temperature is below a warning threshold
- If the temperature is too low, connects to the Nest and raises the temperature target by a specified amount
The full code can be found on GitHub
Conclusion
This project was a fun way to explore interfacing open-source hardware like the Particle Core with commercial IoT devices like the Nest.
All the code and project files can be found on GitHub
